Saturday, August 2, 2008

Amazing Sunsets and Photomerge!

We had such an amazing sunset today in New Brunswick. And this is the view from my window:


In an attempt to get the full panoramic view, I took multiple photos going across the sky and then used Photomerge in Photoshop CS to automatically merge the images together. To get to this option, go to File --> Automate-->Photomerge. You'll need to make sure you have the photos you want to merge open. To get better blending of your photos, click on the "Advanced Blending" option.

In retrospect, the couple things I would change while taking these photos is (1) I wish I'd taken a second row of photos of the buildings below the the skyline so I could make more of a panoramic sized picture and (2) turning my digital camera off Automatic and fixing the focal length/shutter speed & white balance settings. This way, when you merge the photos, you'll see much less of a seam between them.

All in all though, I have to say the Photomerge tool is soo cool and powerful. You can also move around the photos in the preview window if it doesn't align them perfectly, and then it will still do its smart blending.

Tuesday, July 29, 2008

K&P Crop and New Layouts

So I participated over the weekend in the My Kits and Pieces online crop and it was a blast. I had so much fun and was really inspired to do a lot of scrapping - which for me was getting 5 layouts done. Considering they took around 4 hrs each to complete, it's a huge time commitment!

Anyway, I've already showed you the Thunderstorms layout I did which was for the background challenge.

Here are the others that I completed:

Oversized Photo Challenge:


Use 25 of the same shape challenge (the flowers were hand punched and assembled as were the leaves. I cut the vine using my Silhouette and pieced together several pieces):


Journaling Challenge:


And this is my favorite of the weekend because I think it's totally ME - the "I Am So Great" challenge:

Thursday, July 24, 2008

Glam up your photos

I found this tutorial (How to turn your photo into movie-like effect using Photoshop?) through Angie Pederson's blog a while back, but this was the first time I've actually tried to do it myself. There are a lot of neat tricks he uses in his tutorial, but I think my favorite is adding the black layer over the image and then deleting just around the focal point. This really adds a dramatic effect to the photo. Also - being able to fake depth of field in photoshop is pretty cool.


Here is the before:


And the after:


And here's the layout I did for a challenge for the Kits & Pieces weekend crop

Wednesday, July 23, 2008

The Search for the Perfect White Pen...and MORE AC Moore

I've been happily using my Souffle pen for a while now to do all my white pen doodling and writing. I was always disappointed in the past with white pens because they would gunk up or not be as opaque as I would like. The only gripe I had about the Souffle pen was that it took so long to dry and often you had to wait a while to see the writing show up fully.

Well, I've learned that in this market, one should never get too complacent because a better product is always just around the corner. So at a recent crop with the Manhattan meetup group, Julie and I had a debate over which of our white pens was better - the Uniball Signo or the Souffle pen. So I tried her Uniball Signo out for a while, and it did actually write quite well and smoothly - no gunking up and was nice and opaque.

So I went to my local scrapbook store to pick one up so I could do a full comparison, but they didn't have any more in stock. Instead, they suggested the Inkssentials pen, which Sue thought actually works even better than the Uniball Signo (I can hear Julie's gasp of incredulity now).

You can see in the picture below the comparison of the Inkssentials pen to my Souffle pen. I still think the Souffle pen gets a thicker opaque white look - but the Inkssentials pen (and Uniball Signo) is able to write sharper lines, which is nice if you're going to be journaling or doing any detail work. Plus, you get to see it as you're writing and there's no dry time - a big bonus.


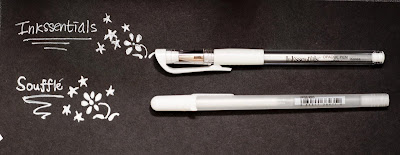
I think I'll still hold on to my Souffle pen for now though for when I doodle and want to color in areas in white, because it has that nice glossy look to it vs. the Uniball or Inkssentials pens where you can see the pen marks.

Now as to the question of the Uniball vs. the Inkssentials - I tried them out side by side at the most recent crop I went to. And I have to agree with Julie (yes I do agree, so stop trying to rub it in) that the Uniball is much better. The ink is much more opaque and smooth. I don't have a picture for comparison unfortunately, but I suppose you'll just have to trust me. =)

In other news - AC Moore is diverging from their usual coupon this week. Instead of the typical 40% off one regular priced item coupon, they are having 25% off your entire purchase - yes, this includes both regular price AND sale/clearance items - with NO minimum purchase amounts required. So of course I went and scoured the clearance section because you don't get a chance like this often. Here are some of my favorite finds:

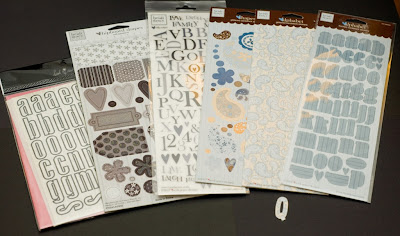
American Crafts Chipboard shapes - $1.50 each!

They have felt too, but I'm still not really into the felt thing - sticking to chipboard for now. This is a LOT of shapes, I can't possibly use this all myself, but it was such a great deal I could pass it up. I'll probably end up divvying some of this up for a RAK later.


Assorted rubons from Heidi Swapp and stickers/chipboard from Heidi Grace - $1.50 Each.

They have a number of different alphas available on the HS rubons, but I have most of them already, so I passed them up for some cute Heidi Grace stuff. That second to last sheet is an alpha, you can see an example of a Q at the bottom.


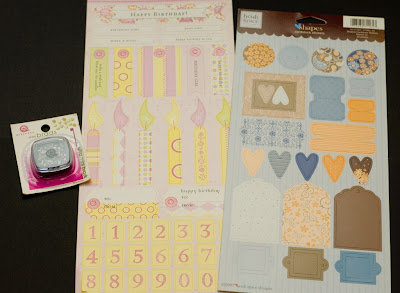
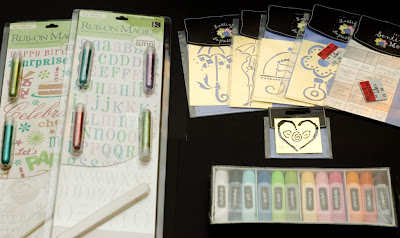
Assorted mini-brads from Queen & Co and random birthday stickers - only 75 cents!!
The Heidi Grace stickers were $1
They also had a bunch of other Queen & Co stuff ranging from 75 cents to $2, but I have a lot of it already, so I just picked up these.


Assorted pack of chipboard shapes from Colorbok - only $4


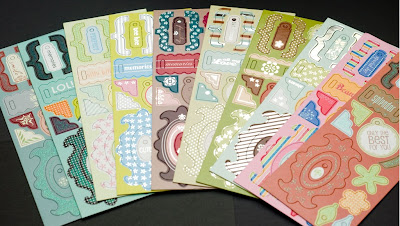
Rubon magic - assorted shapes and alphas $1.50 ea
Lasting impressions stencils - $2 each (I'll show you a cute card using these later - my only gripe is that no store around me sells the paper!)
Set of assorted acrylic paints - $2!


One note to keep in mind while you're shopping your AC Moore clearance rack - when you check out, make sure that they actually ring up the bar code on your items because the price is often up to 50% cheaper than the last marked price on the package, especially for the more expensive items.

Oh also - the other regular sales they're having this week are cardstock (the 39 cent priced ones) 6 for $1 - so stock up on your white and black sheets. Also, their entire sticker selection is 25% off (doesn't include chipboard stickers though). I got some thickers and K&Co stickers - with the 25% off and the coupon, it comes out to about 37.5% off the regular sticker price.

Happy shopping!

Thursday, July 17, 2008

Camera RAW Update

So I finally installed my copy of Photoshop Elements and tested out Camera RAW 4.0 to see if it's all it's hyped up to be. The new sliders they've added really do work much better than the old ones. I believe they've split the old Shadows slider into the new Recovery, Fill Light, and Blacks sliders. These work way better than using Brightness and Contrast to get interest in your image.

They've also added Vibrance above the Saturation slider at the bottom and this basically increases the vibrancy of your colors without making them look well, basically bright orange and blue.

I've also confirmed that you can use this on your regular JPG files, although the quality of the image resultant from that will depend on how much data is contained in your JPG file. In order to do this, select the "Open As" option from your File menu and then choose the "Camera Raw" option under the "Open As" drop down selection and then just choose your file. Of course, it works best on the RAW file formats.


Here is the same image from the shaZAM method using the camera RAW plug in instead. The face does come out a little redder, but I love that the picture quality is retained so well.


For direct comparison, here are the original file and the shaZAM photo again (I redid the photos because I think the file size or something distorted the colors a bit and they shouldn't have looked as different as they did):


Tuesday, July 15, 2008

Photo shaZAM

I decided to try out this photo editing tutorial posted by Jessica Sprague today. The results look a little better on my computer but for some reason when I upload them, the color gets washed out a bit. Anyway. It definitely does brighten up the picture a bit.

I'm actually waiting to get either CS3 or the latest version of PSE because they're supposed to come with Camera RAW 4 with has 2 new sliders - the Vibrance and Luminosity sliders - which allow you to do a lot of this type of editing directly in the Camera RAW add-in and not have to fumble with layers. And they changed it so that you can use Camera RAW on jpg files now too so that you can change white balance settings for those as well! Although this technique does allow you to fine tune more which areas get changed.

BEFORE:


AFTER:

Weekend Card Making Session

Well, I got around to using some of my new stamps over the weekend and I have to say, I really love them. They are so me. haha. My husband looked at the cards and said "whoa, those are really classy-looking. I bet you could sell them for a lot." Of course with him, it's all about the money. Anyway.


Saturday, July 12, 2008

Hero Arts Stamps

I went to my LSS today, the Scrapper's Cove, and they had some really cute sample cards from Hero Arts on display. I *heart* the coffee cup one and the little birdhouse one.


So anyway - the stamps are adorable - so of course, I just couldn't resist picking some up while I was there...hee hee, these make me really happy right now. The Sparkle Clears come with their own set of bling too. Not sure if you can tell from the picture, but all of the cards have a little bling on them. It's so adorable.


Of course, as I was checking out - the front counter had all these really cute $1 - $3 stamps, and I just had to pick out a few of those too. These are Imaginisce Snag Em Stamps mostly, but the cupcake one is See D's.


Anyway - now I'm all inspired so I might try making some tomorrow if I get some time to myself. The hubby is planning to go to his parents' to help seal the driveway (good thing I'm ducking) so might be a good day to scrap.

Wednesday, July 9, 2008

Exciting News!

I've got some exciting news! I'm going to be teach a class on advanced techniques for using the QK Silhouette at Scrapper's Cove in August. In case you don't know what that is, it is a die-cutting machine that hooks up to your computer and allows you to cut out text in any true type font you have installed and also custom shapes as well. It's easiest to purchase and download shapes from Quickutz or from other places on the internet, but I'm going to be teaching how to create your own custom cut-outs like the butterfly shown below:


from this scanned image of a Fancy Pants patterned paper.


I'm also going to show how to create a silhouetted image around the design and weld your scripted words together so it cuts as one whole piece. In the end, you'll end up with this finished layout:


If you're in the New Brunswick / Milltown, NJ area and want to sign up and see what it's all about, go to the Scrapper's Cove website at http://www.scrapperscove.com/ and click on the Classes link for more information.

Tuesday, July 8, 2008

Super Sale at AC Moore

AC Moore is having a sale this week and I highly recommend you stop by if you can and there's one nearby. The best deal by far is their regular Bazzill paper which is 4 for $1. I stocked up on a lot of paper. Unfortunately, my local AC Moore doesn't have the best selection of colors, but at least I got something.

Also - their clearance items seem like they're ringing up for an additional 50% off the marked price (or at least my items did) so check it out. Sweet Petite Ribbon is $1 a spool, 1/8" ribbon is 4 spools for $1, and acrylic paint (not sure if this is acid free though) is 4 for $1. There's also a 3 tiered rotating organizer caddy (kind of like a clip it up with plastic bins) for your scrapbooking / crafts items like paints, tools, stamps, etc that's only $10 I think.

One awesome deal which was only valid today was 20 sponge brushes for only $1!! yes - you did not read that wrong, $1. Anyway I think the specials are going on for a few more days so check it out if you have time.